
This article is intended to illustrate the effects of camera placement on our engagement to, our ability to navigate and our freedom to create content within virtual worlds such as Second Life. I touched on much of this in "A Matter of Scale", but wanted to expand on the specific issues of camera placement in SL beyond the impact on scale, as well as explain how the camera placement settings in Second Life actually work.
A Matter of Perspective
The importance of camera placement in virtual environments.
"The video game industry spent a decade learning important lessons about how camera placement impacts our interaction with, and enjoyment of, virtual worlds -- lessons Linden Lab cannot afford to ignore."
If you're in your late 20's or early 30's and have been playing video games since the 90's you probably recall what a hot issue camera placement was up until about 2005. In the early days of third person 3D video games how well the camera behaved was one of the primary concerns of most gamers. It could, quite literally, make or break a game.
From the time the first 3D gaming consoles arrived up until about 2005 every review of a third person video game made some mention of the camera placement and how it affected or hindered game-play as games came and went with varying degrees of success in dealing with the camera issue.
The video game industry takes the issue of camera placement very seriously, trying many approaches to the issue to see what worked and what didn't. In 2005 Capcom's "Resident Evil 4" hit the market with a new "over the shoulder" camera view that worked so well for third person videogames that it has become the industry standard.


Why is the over the shoulder view so popular?
There's three primary reasons.
Environment Creation - The camera is crucial to environment design. You can't have cramped, claustrophobic corridors or a small shed in the woods if the camera sits so high it will wind up on the wrong side of the walls or ceiling. Larger environments don't seem nearly as large and impressive. Everything needs to be upscaled for usability and aesthetic impact, which presents additional problems, such as the fact that it will become increasingly difficult to keep the on-screen characters in scale with the environment.
Usability - The additional sense of "place" extends to a more intuitive sense of where your avatar is standing in relation to your surroundings, even when you may not be able to see your avatar's feet. This makes it easier to navigate your environment
Immersion - Placing the camera closer to eye level puts you, the player, into that world, rather than making you an outside observer watching from afar. It gives you more a sense of presence within the world.
As you can imagine, all of this translates directly into a non-game 3D environment like SL, especially in the case of environment creation which is much more important directly to SL users, since the environments in SL are all user created.
Let's take a look at the camera placement in Second Life.
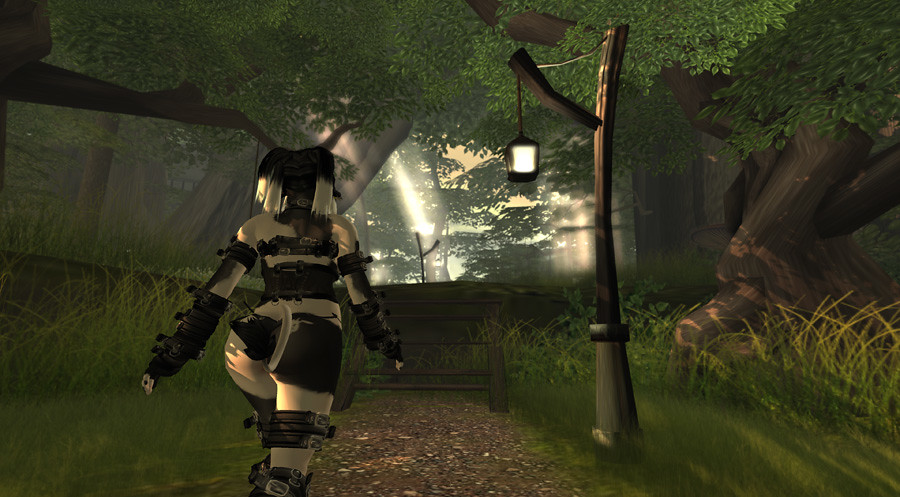
Second Life has had the same camera placement since Linden Lab first opened the doors in 2003. The camera placement in SL is set very high above the avatar. Zoomed out far enough to see your whole avatar it sits approximately 2 metres over your avatar.


How does Second Life's camera placement affect environment creation, usability and immersion?
Take that building to the right of my avatar in the screenshots above. The criss-crossing roof supports sit at about 2.65m high. For a bit of perspective, the average ceiling in the average apartment/house sits lower at 2.45m high. I'm not even talking the roof itself, which peaks much higher.
Despite the high ceiling, this is what it looks like when I wander inside with SL's camera placement.

By resting so far above the avatar, the SL camera pushes up minimum required ceiling height. Taller ceilings will make buildings and rooms look stretched, which encourages people to expand outwards to compensate. This contributes to SL's scale problems by pushing environments out of scale with avatars, which encourages people to make larger avatars, which in turn pushes the camera up further because the taller your avatar is the higher up the camera rests.
This greatly reduces your freedom to create in SL, since you are then forced to compensate for the SL camera. At least if you are designing an area open to the public, such as a shop, club or a role-play sim. Also, larger builds eat up more prims and more space, leaving you with fewer options for content and detail in your build.
These same issues make it extremely difficult to navigate smaller environments in SL, contributing to tendencies to greatly over-scale environments in SL. You just need much more space to see your surroundings than you would with camera placement closer to eye level.
You can also see from these screenshots how the view in SL is more removed from your avatar than the shown in the video game examples, reducing immersion and engagement. You are not inside the room with your avatar, you are watching a character on a screen from above.
Why should this matter to me? I'm always alt+camming around my environment anyways!
Chances are you're only using alt+cam to zip your camera around your environment when you're standing still. So as long as you're moving, camera placement is important. SL is not IMVU, your avatar isn't a static element in a 3D environment hopping between pre-set poses within a room, you can walk around, explore.
If you want to explore a cave, wander the corridors of a dark spaceship, a dimly lit fallout shelter, or simply walk from one room to another in your own hosue in SL you are affected by this.
Is there any way to improve the camera placement in SL?
Yes, it's actually quite easy.
Some readers may recall that Torley Linden posted, some time ago, a video with instructions on how to adjust the camera placement in SL. Unfortunately Torley's video only covered half the process. There are actually two debug settings you need to change to properly adjust your camera placement in SL.
Here's a screenshot to help you visualize the settings.

It helps to think of these two debug settings as tacks on a cork board with a string tied between them. "A" in the graphic above represents your "CameraOffset", this is the setting Torley mentions in the video.
"B" in the graphic represents your "FocusOffset", in simple terms this is the area in space where your camera is pointed.
Let's take a look at what happens when you adjust "A", the Camera Offset, without adjusting "B", the Focus Offset.

So this is why we need to also adjust "B", to keep the camera angled forward and down.

Seeing is believing, here's a few comparison shots between the default SL camera placement and some custom settings I'll share in a moment. The default camera is on the left, my own settings on the right.

In an open environment you don't run into too many difficulties, although you are more removed from your avatar, as if watching from above. The lower camera angle brings you into the world with your avatar. It's more like "being there".

Inside is more of an issue, here I've even angled the camera down slightly so it's below the ceiling support beams, but what you can't see here is that this caused issues between my camera and the wall behind me. My camera continuously snapped from inside to outside the wall. I have no such issue with my own camera settings on the right. Also, you can see that it is much easier to judge where I am in the room in relation to the hay bales scattered about than it is with the default camera placement where my avatar is cut off above the waist. I don't even see the ceiling supports from an eye level view unless I angle my camera up!
Not one bit. Vehicles, camera positioning HUDs, chairs that take over your camera placement, will all work exactly as they did before.
What if I don't like the changes after I've made them?
Simply look up the two debug settings you changed and click the "Reset to Defaults" button for each one. This will reset your camera to the original SL default placement, exactly as it was before you made any changes.
Alright, how do I change my camera placement?
This is simple, but I will need to go into a bit of detail because it is slightly different between 1.x viewers and Viewer 2.
I am including in these directions the changes one needs to make to get either a centred view or a left shoulder offset. Most people prefer the right shoulder offset however some people who do not play many videogames have found the offset view difficult to adjust to and I've had at least one person ask me how to get a left shoulder view.
First you need to reveal the Advanced menu at the top of your screen. To do this simply press ctrl+alt+a and the menu will appear to the right of the Help menu in your menu bar. Viewer 2 users can also go to the Advanced tab in Preferences and select to have the Advanced menu shown.

From the Advanced menu select "Show Debug Settings", near the bottom.

The Debug Settings panel will appear. At the top of the Debug Settings panel is a field where you can type the name of the setting you'd like to adjust.
Viewer 2 users will want to type "CameraOffsetRearView".
People using a 1.x viewer will instead type "CameraOffsetDefault".

The panel provides you with three integers to change for the x, y and z placement of your CameraOffset. Change them to these settings;
x: -2.000
y: -0.400 ( Make positive for a left shoulder offset, leave as 0.000 for a centred view. )
z: -0.200
Once that is done click on the input field again and move to the next setting;
Viewer 2 users will type "FocusOffsetRearView".
People using 1.x viewers will type "FocusOffsetDefault".

Once more you will have x, y and z positions, this time for the focus point.
Change them to these settings;
x: 0.900
y: -0.700 ( Make positive for a left shoulder offset, leave as 0.000 for a centred view. )
z: 0.200
Viewer 2 users will see their camera change as they enter each number, 1.x users may need to restart SL to see the changes to their camera take effect.
Now, while most people seem to enjoy the camera settings I have heard a couple puzzling complaints.
Ack! My avatar fills my screen! This is terrible!
Simply zoom the camera out! The mousewheel zoom controls work exactly like before. You can also adjust the "x" CameraOffset to move the default camera position forward or back.
Simply zoom the camera out! The mousewheel zoom controls work exactly like before. You can also adjust the "x" CameraOffset to move the default camera position forward or back.
I didn't like these settings because I couldn't see my avatar! I want to see more of my avatar, not less!
This is an extra odd one because these settings should bring more of your avatar into view, not less. I've found this one always seems due to a mistake made when adjusting the settings. Make sure you change both the CameraOffset and the FocusOffset.
This is an extra odd one because these settings should bring more of your avatar into view, not less. I've found this one always seems due to a mistake made when adjusting the settings. Make sure you change both the CameraOffset and the FocusOffset.
If you did everything correctly your view in SL should resemble this;

Additional Camera Features
I also wanted to mention some interesting camera features that many are aware of, but many are not.
Are you aware that you can move your camera around with the mouse as you're avatar is moving? You can even steer your avatar this way for finer control of your avatar in navigating an environment!
To make use of this feature simply move your mouse cursor over either your avatar or your avatar's name tag then press and hold the left mouse button.
While holding the left mouse button down, move your mouse. You'll find your camera moves as you do, move the camera far enough to the left or right and your avatar will begin to turn in that direction. You can also angle the camera up or down in this way, even as you're walking.
 |
| Click and hold on your avatar to angle your view up or down, even as you move! |
Enjoy your new perspective in Second Life!
I recommend visiting sims like Mont St. Michel, Doomed Ship, the Wastelands and 1920's Berlin, all of which are vastly improved by better camera placement, to see just how different it can be when travelling through small corridors, underground tunnels and through 1=1 scale environments.
Here is a Jira requesting these changes be made in the official viewer.
The nice thing is that with one of the Viewer 2 updates LL introduced camera placement presets. There is now a rear view, front view and a side/group view camera preset built into Viewer 2. This is why the Camera and Focus Offsets were renamed for Viewer 2. This means LL could easily add in more presets, such as creating a new default preset, while retaining the old camera placement as a "classic view" for residents unable to adjust to a new camera placement. They could also make the left shoulder offset and centred view as easily selectable presets one can choose from either the "Preferences" window or the "View" panel.
Given the popularity of the "over the shoulder" view it seems guaranteed to help draw in and retain more new users and with how simple it is to implement it's a wonder they haven't already.
Hi Penny,
ReplyDeleteas you suggested, here are my tweaks for camera and focuspoint.
I did like the camera a little bit lower, therefor i put the focuspoint a little bit higher so its more pointed upwards, making it easier for me to see a little bit more ahead. First I thought I wouldnt like the shoulder offset. but then i realized it isn't bad at all. but i draw it a little closer to my ava.
CameraOffsetRearView
X= -2.000 Y= -0.200
Z= -0.400
FocusOffsetRearView
X= 1.000 Y= -0.300
Z= 0.400
<3 Ancale
Absolutely brilliant, thank you very very much.
ReplyDeleteWorld of difference.
Thanks for reporting this on the Issue Tracker too, Penny — as you may've already seen, both Erica Linden and myself commented recently.
ReplyDeleteYour post helps round up a lot of loose info.
Thanks Torley! Hopefully some of the fixes and suggestions will make it from that Jira to a viewer in the near future.
ReplyDeleteThank you Penny.
ReplyDeleteI have translated it into german and to help spreading the words (and pictures)
What a wonderful read.
ReplyDeleteI never actually, truly appreciated the significance of a good camera angle, nor had any idea of the difference tweaking the default rearview offset made.
I also really enjoyed how you presented the subject as a whole. It was a joy to have my eyes opened by this lesson.
Seriously, thank you. For this, and all your other tutorials as well. You're awesome. :]
Thank you so much! This improves the SL experience tenfold!
ReplyDeleteThanks for this. I've been using a Camera HUD to achieve the same result fro some time, but this lets me drop the HUD and run one fewer scripts.
ReplyDeletePenny,
ReplyDeleteYou know how thankful I am for this I use this on all viewers. However I seem to be having a problem in Firestorm where it rests the view if i TP anywhere. Any idea what this is?
Hello Penny.
ReplyDeleteI've proceeded to tweak your suggested camera settings a bit. Mine are as follows:
CameraOffsetFrontView:
X 1.950
Y 0.000
Z -.0350
FocusOffsetFrontView:
X 0.900
Y 0.000
Z 0.350
CameraOffsetRearView:
X -1.950
Y 0.000
Z -0.350
FocusOffsetRearView:
X 0.900
Y 0.000
Z 0.250
CameraOffsetScale:
1.350
Thanks for your efforts! However, I don't expect LL to do anything about it...
This is an excellent idea and I'm going inworld to try it right now. One small note, though - in any viewer I've ever used, the keyboard shortcut for the Advanced menu is Ctrl-Alt-d, not Ctrl-Alt-a.
ReplyDeleteWow I'm 12 years old in SL and did not know I could move the cam with my mouse while I am using arrow keys to move my avatar.
ReplyDelete