
I've updated this post! Check out the polished up version of this article!
Last year I wrote a lengthy article explaining why camera placement matters in virtual environments, how the SL camera works and, finally, how to improve the SL camera yourself by adjusting some debug settings. By popular demand, here is an excerpt with just the part about how to improve your SL camera!
Last year I wrote a lengthy article explaining why camera placement matters in virtual environments, how the SL camera works and, finally, how to improve the SL camera yourself by adjusting some debug settings. By popular demand, here is an excerpt with just the part about how to improve your SL camera!
The Improved SL Camera
If you like these camera settings, contact LL or the creators of your favourite SL viewer and ask them to include them as selectable presets! That way you don't have to manually enter them in with every viewer update and you can more easily share them to your friends!
I am including in these directions the changes one needs to make to get either a centred view or a left shoulder offset. Most people prefer the right shoulder offset however some people who do not play many videogames have found the offset view difficult to adjust to and I've had at least one person ask me how to get a left shoulder view.
First you need to reveal the Advanced menu at the top of your screen. To do this simply press ctrl+alt+d and the menu will appear to the right of the Help menu in your menu bar. Viewer 3 users can also go to the Advanced tab in Preferences and select to have the Advanced menu shown.

From the Advanced menu select "Show Debug Settings", near the bottom.

The Debug Settings panel will appear. At the top of the Debug Settings panel is a field where you can type the name of the setting you'd like to adjust.
Viewer 3 users will want to type "CameraOffsetRearView".
People using a 1.x viewer will instead type "CameraOffsetDefault".

The panel provides you with three integers to change for the x, y and z placement of your CameraOffset. Change them to these settings;
x: -2.000
y: -0.400 ( Make positive for a left shoulder offset, leave as 0.000 for a centred view. )
z: -0.200
Once that is done click on the input field again and move to the next setting;
Viewer 3 users will type "FocusOffsetRearView".
People using 1.x viewers will type "FocusOffsetDefault".

Once more you will have x, y and z positions, this time for the focus point.
Change them to these settings;
x: 0.900
y: -0.700 ( Make positive for a left shoulder offset, leave as 0.000 for a centred view. )
z: 0.200Viewer 3 users will see their camera change as they enter each number, 1.x users may need to restart SL to see the changes to their camera take effect.
Here's some solutions to issues some people run into.
Avatar fills entire screen. Simply zoom the camera out! The mousewheel zoom controls work exactly like before. You can also adjust the "x" CameraOffset to move the default camera position forward or back.
The view is odd, I can't see where I'm going/camera points up!
Make sure you change both the CameraOffset and the FocusOffset. If you only change one and not the other it wont' do you much good at all!
Make sure you change both the CameraOffset and the FocusOffset. If you only change one and not the other it wont' do you much good at all!
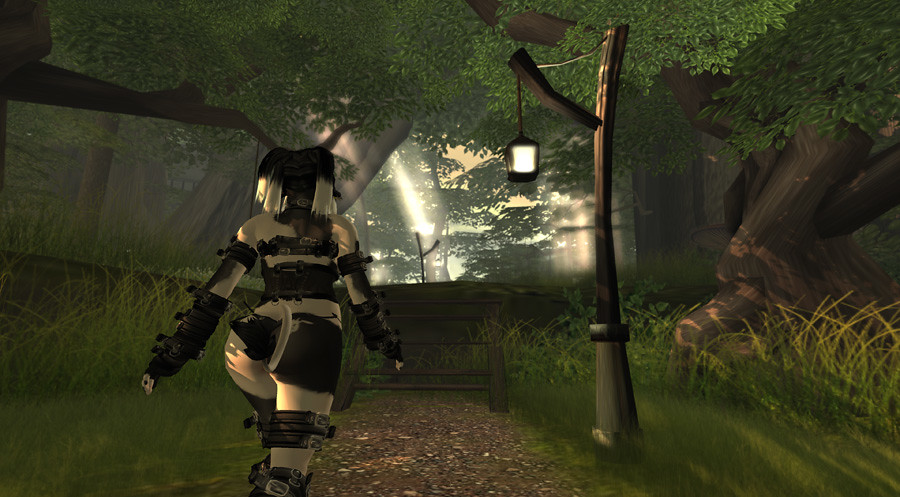
If you did everything correctly your view in SL should resemble this;

And this;
 |
| Click and hold on your avatar to angle your view up or down, even as you move! |
05-07-2012 Update! FOV improvement!
Something I've noticed is that you can improve your SL view further by altering the FOV.
First, press ctrl+9 to make sure your FOV is at the default. Then, hold the ctrl key down and press 0 about 6 times. The resulting effect is that SL seems to have a greater sense of depth.
It's difficult to capture this effect in screenshots as it has more to do with the way things look as your camera moves about, but I've found this to be a huge improvement in making SL look more cinematic.
Love the camera trick. It really makes SL better IMO. Though I do keep the Y axis centered by personal taste.
ReplyDeleteReally awesome blog you got here, I also love the posts about scale, proportions, and your windlight.
This blog is a must read for all the Lindens out there.
Thanks very much for posting this! I was going to use the HUD to do pretty much the same thing, but am always glad to be able to do things client-side without having to add an extra scripted attachment.
ReplyDeleteOMFG FINALLY!!!!!
ReplyDeleteThank you so much I was going nuts! And my home was the biggest reason I needed to change the camera setting. I only needed to change the Z coordinate becuase my view was up in BFE! Thanks again!
Well this is much better than HUD since you can change the POV while the UI is removed.
ReplyDeleteOrmand Lionheart
Thank you so much for this Penny. While Nirans is in the alpa phase I am having to use other viewers and the default view is ridiculous. This is a big help.
ReplyDeleteThank you very much for those tips. However, it should be noted that ctrl-0 does not *increase* your FOV, it is used for *decreasing* the value. You can check for yourself: In the "Develop" menu, select "Consoles", then "FOV". Default is 60 whereas hitting ctrl-0 six times will lower that to 20.1 degrees. I prefer a slightly higher FOV than default, sitting around 70 to 80. You can do that using ctrl-8. The sense of depth is vastly increased like that, but it also means there's more to render since your viewing angle is quite a bit higher.
ReplyDeleteThis comment has been removed by the author.
DeleteHi Penny, Just a Quick TY!! Made these the default settings in my viewer.
ReplyDeleteIn the last 24hrs I’ve had 5 users contact me saying they love the new view! Glad I found this post now, so Thanx!
@Pseudonym
ReplyDeleteI'm going to blame dyslexia on my part.
@Connor
I'm glad this has helped! I've gotten nothing but positive feedback from these camera settings, which says something as people are more likely to leave negative comments than positive.
I'm still trying to convince Firestorm to adopt these settings, at least as one of their included camera presets if not a default, but they're concerned people won't like them because they're so different than the Linden default.
Settings advice very welcome. Thanks.
ReplyDeleteWorks wonderfully!! Perfect for exploring and the more realistic size builds I prefer. Thanks!
ReplyDeleteThis camera setting is really good as it not only helps to capture the photography in a systematic manner but, it is easy to use the camera by setting it for photography purpose.
ReplyDeleteVisit Us
Graphics and text setting differ from each other.
ReplyDeletethis setting was in fact the best!:) Thank you
ReplyDeleteSorry I don't agree. done everything as you stated and now when I zoom in to look at my partner the closer i get the fuzzier her body becomes .. and i did this from getting your blog address from amazon forest group ..
ReplyDelete