This article is a short guide to making a decent SL avatar shape! Previously I'd written a much longer version which included a brief explanation of human proportions as understood by artists as well as a guide to the SL appearance editor. If you'd like to read all that click here!
A Brief Guide to Making Shapes
How to make a good avatar shape with proper proportions.
With a basic understanding of human proportions and the quirks/bugs of the appearance editor, it is possible to create decent shapes in Second Life.
You will need only two things to get started.
1. A small piece of land where you have rez rights and prims available. A sandbox will work nicely.
2. A pose stand with the poses shown below, or at least the "T-pose" and either of the other two will be fine.
 |
| Arms straight forward, "t-pose", arms at sides. |
You can get a pose stand free off the SL marketplace.
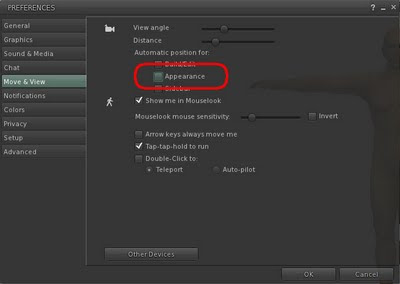
Next you will want to press ctrl+p to open the Second Life Preferences panel. Go to the "Move and View" tab then look for "Automatic position for:" and uncheck the box next to "Appearance". This will allow you to enter and exit the appearance editor without being kicked off of your pose stand.
Before you get to shape making, remove all attachments. Especially shoes and hair (unless prim body parts are a part of the shape you intend to create), also remove any shoe clothing layers (unless the shoe layers are being used as a part of your base body shape).
The first thing you will want to do is determine the desired size of your avatar. For a plethora of reasons I would recommend aiming for a believable size unless your avatar is something deliberately larger or smaller than a human, such as a minotaur or a dwarven warrior.
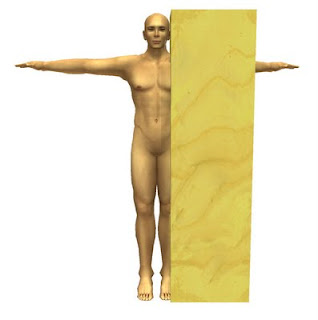
The best way to do this is to decide the height you would like your avatar to be, convert it to metric and create a prim that size to use as a guide. Position the prim next to your avatar and scale your avatar down using the height, neck length and leg length sliders until your avatar is about the height of the prim.
At this point you do not need to be exact, as your height will be fluctuating as you edit proportions.
Second, you want to adjust your head size. Rez a cube and set the transparency to 50%, then place the prim over your head. Stretch the prim until it is the same height as your head, from the bottom of your chin to the top of your skull. Copy the side to the rest of the cube's dimensions. That represents "1 head unit".
Copy the prim down until the last one reaches past your feet then count the number of prims. That is how many heads tall your shape currently is.
As the SL starter avatars and default shapes tend to have abnormally small heads you may need to increase your head size and repeat this process several times until you achieve a head to body ratio you are happy with. The taller your avatar is the smaller your head should be relative to your body.
A 6' tall adult would be about 7.5 to 8 heads tall. A 6'3"-6'4" tall person may be between 8 and 8.5 heads tall. A 5' tall adult might be closer to 6.5 to 7 heads tall.
Remember, you have more proportions that need adjusting yet, so if your head size has you around the desired 7.5-8 heads tall range yet still looks too small that may change as you adjust torso and shoulders.
First, however, we move our attention to the leg to upper body ratio. The very bottom of your avatar's crotch should be about the middle point in your body if you are aiming for "ideal" proportions. Copy your height cube from earlier and stretch the top down to the bottom of your avatar's crotch then tint it green. Copy the prim upwards until it is end to end with the first, tint this second prim orange.
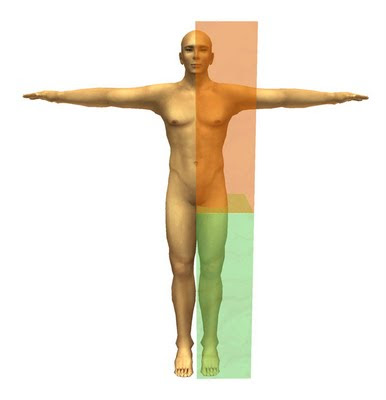 |
| The prims in this image are actually even with the base of the feet and the top of the skull. Perspective plays tricks. |
For idealistic shapes, leg length should be about equal to the upper body length, meaning the top of the orange prim should rest about even with the top of your avatar's skull. You can shorten the legs slightly, by up to a few inches, to get a more muscled look that emphasizes the upper body.
Women can achieve a "long legged" look by increasing the leg length by a couple of inches. It doesn't seem like much, but a combination of such small changes in proportion can completely alter perception of a figure.
Also keep in mind that you have three sliders to adjust at this point. The leg length slider, torso length slider and neck length slider. Remember all three sliders affect your height, but the torso slider affects it the least, meaning less adjusting og head size later if most of your adjustments are with the torso slider. Just try to avoid a squashed/stretched torso look.
With that taken care of we'll want to take a moment to check height and head ratio again. Make sure you're still about the height you are aiming for and the proper number of heads high for your desired body type. Since you should not be off too much you can probably make small adjustments to the height slider to get back to where you'd like to be. Otherwise adjust head size and re-check the head to body ratio.
Now we move on to the upper body proportions.
 |
| As you can see, this shape is slightly wider than 2 heads at the shoulders. |
You'll want a good "arms at sides" pose, lacking that a pose with your arms straight forward. Measuring your torso width to the outside of your upper arms you should be about two head units wide. If you are going for a muscled, burly look you may want to be slightly wider than 2 head units. The "Heroic" shape in our figure lineup is 2 and 2/3 heads wide.
For a more slender look you can narrow the width here slightly. Be careful, too much and you will wind up looking more child-like or pear shaped if your avatar has wide hips.
You have the Shoulder Width, Body Thickness, Body Fat and Torso Muscle sliders at your disposal to balance out a good torso width.
Next we take a look at our avatar's hands.
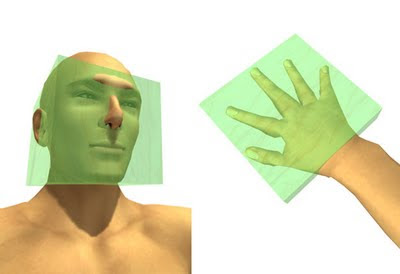
The average adult's hand is roughly the size of their face. That is, measuring from the bottom of the chin to about halfway between the eyebrows and hairline should equal the measurement from the base of the palm to the tip of the longest finger.
Some men may like to go slightly larger for that "big, strong hands" look, but too much and it will look cartoonish.
Once the hands are a good size we move on to the wingspan, which is the measurement of your arms stretched out to either side. The measurement of your wingspan relative to your height is known as the "ape index". The "ideal" adult shape has a wingspan that is equal to their height.
We can measure this on our avatar by taking the prim we used to measure our avatar's current height, centering it with the body of our avatar and flipping it on its side.
Keep in mind that the avatar bends the shoulders in an odd way, squishing them into the avatar torso slightly. You can account for this by making your wingspan an inch or two shorter on each end than the height prim. Extend all the way to the prim for slightly exaggerated arms.
Overly muscular men may wish to make their arms slightly longer to emphasize upper body strength. Remember that making the arms too long results in an ape-like or cartoonish look. Short arms are generally considered unattractive so you want to be sure that your arms are at least within a couple of inches of your height.
Once we're satisfied that our avatar's arms are the proper length we can check our feet. The "ideal" adult's foot will be as long as their forearm, measured from the wrist to the elbow.
As you finalize your shape here are some more tips and reminders.
Your hips are not as wide as the outside of your shoulders. Where the "ideal" adult shape is 2 heads wide at the outside of their shoulders they are only 1 and 1/2 heads wide at the hip. Women's hips are accentuated by a thin waist. The "ideal" woman shape is 1 head unite wide at the waist.
Breasts, belly, bodyfat and other shape attributes tend to distort when pushed to either extreme. Try to find a good balance.
Even the "ideal" body shape should have a bit of bodyfat. As a practical issue, body fat of zero increases unnatural looking sharp edges on the avatar shape.
If you are not well versed in human proportion and anatomy then search the web for figure drawing and other proportion guides that may help you with aspects such as facial features and achieving specific body types.

